Wednesday 29 February 2012

Yarn Along

Last day of summer for us in the Southern Hemisphere today and although I have been knitting over summer, there have been a few way too hot days where knitting was just too sweatily impossible. Looking forward to cooler days and actually being able to see some of the knitting worn!


This week I am reading The Kitchen House by Kathleen Grissom. Historical fiction, my favourite. It is set on an isolated plantation in Virginia in the late 1700s. There are the usual cast of characters for a novel with this setting:-

* The benevolent but usually absent master
* The weak, slightly hysterical, laudanum dosed younger mistress of the house
* The cruel overseer who is stealing from the master and blaming the slaves
* The daughter of the master and a slave who the master doesn't quite know how to treat
* The kindly mama slave who takes quiet control of the mistress

Even though it is formulaic, still an enjoyable read.

Knitting wise, I am knitting some (we will see how many!) hot cross buns for Easter play, using this pattern. As you can see, I quickly knitted a few rows of the first one to take a photo! So will comment next week on the pattern.

Also making some rainbow gnomes. I dyed this 4 ply in rainbow colours a very long time ago (the yarn was originally used to make my daughters some gnomes and they are now 16 and 14!!) I already had the pink one from years ago. They are knitted using the Little Knitted Gnomes pattern from The Gnome Craft Book. They are the perfect size for finger puppets.


Look forward to seeing all the beautiful knitting over at Small Things.

Tuesday 28 February 2012

Crafting On Tuesday

Linking today to Frontier Dreams for Keep Calm Craft On.

I finally made the rainbow silk angel mobile. I dyed the silk for this ages ago, washed and carded the wool, and then it sat...and sat...and sat!
But here it is!


I think the angels are too crowded together, but this is the ring I had available to use.
I followed the basic directions in The Children's Year, but I cannot remember where I saw one arranged like this, with the colours spiralling down.

I used the 11 x 11 silks from Thai Silks and dyed them using Wiltons cake icing pastes.
I used beading elastic because that is the clear thread that I had on hand, but I think fishing line would have been easier to work with - the beading elastic was well, too elastic! It was really difficult to tie into knots.

I rolled a small ball of carded wool, placed it in the centre of the silk, then tied beading elastic around to make a neck. Using a long doll needle, I then threaded the elastic through the top of the angel's head. OUCH!!!


Tie the beading elastic for each angel onto the ring, arranging the angels as desired. I think in the book, they are arranged in a line on a branch.

Tie four ribbons to make the hanger. Wrap the ring in another ribbon to cover all the knots from the hanger ribbons and the beading elastic.


Tie the four hanging ribbons together with a knot. I then used the leftover end to tie a bow.

The longest part in the whole thing was wrapping the ring in ribbon! Next time I might use a thin ribbon, embroidery floss or wool through the angels' heads - then the knots would look nicer and I wouldn't want to cover them up!

Just a little note for any Australian readers. I have mentioned my sheep before and how excited I am to finally be using my own wool for projects. I have heaps of white from our sheep and black from a friend's sheep. So if any sheepless Australian readers would like a little parcel of white and black sheeps wool sent their way, let me know at steinermum22@gmail.com - it will come totally natural, as it came off the sheep's back! So children can go through the whole process of washing, carding (you don't need carders, just hand tease the knots out), dyeing if you wish and using!
I have made this tree and this sun.
Just drop me a message if you would like some - just be aware it will be NATURAL, ie. smelling of sheep and with bits of grass and hay in it!

Monday 27 February 2012

Menu Planning

I tend to jump from being a menu planner to being a fly by the seat of my pants kinda cook. I AM mainly organised, but some reason, Christmas always seems to put me out of the habit for a while - OK, a long while!
But I am back on board now and thought I would share how I do it.
Now food storage and preparedness is a large part of my thoughts on this topic, but I will not go into it too much as there are many, many other sites out there.

Food Storage Made Easy - a very easy site to navigate, lots of checklists and a free Excel spreadsheet to keep track of your storage.

Everyday Food Storage - great recipes, lots of organisation tips to help you get the best out of your food storage. I will be making this banana cake recipe tomorrow as Aldi had bananas for 89c a kilo today!

 It is certainly worth doing, even if only for a little peace of mind when you cannot get to the shops due to a sick child, broken down car, whatever. As I have been busy with other things lately, I haven't done a big grocery shop for the last two months and we have been living on our stored items (just had to get milk, fruit and veg). It is just really handy to not have to be always worrying about whether there is enough toilet paper, or running out of something and having to rush to the shops. So even if you are not right into preparedness, I think it would be worth while to plan to have a three month supply of basic items.


To plan my menu for the week, firstly I go through the fridge, fruit bowl, etc and see what desperately needs to be used up. Make a list of these and note any ideas.

Next, I pull out a selection of cookbooks, magazines, wherever you find recipes.


I particularly like ones that are arranged by season or month.
I will make a list of any recipes I would like to try out.

Then I start the menu for the week. I always include a combination of old favourites and new ones.

Once the menu is planned, I write down the ingredients I will need. I just keep a running list as I go through the recipes. So, I list the ingredient and then mark off how many I will need.  
For example, eggs normally appear a few times, so I just make a mark next to 'Eggs' each time I need one.

Next step is to work out what I already have on hand. I have an Excel spreadsheet listing all the stocked items. I know, I know, I used to be an accountant in another life!!

Then a shopping list can be made.

I am planning to keep this more organised as I find if I have not planned dinner ahead, it all just gets too hard!

Friday 24 February 2012

Creative Friday

Linking to Linda at Natural Suburbia for Creative Friday today. Not much to show though! I have mainly been knitting which has already been shown on Wednesday Yarn Along.
Nothing like the beautiful swan Linda has made! It is my favourite of her patterns so far.

I made these for the beginning of our felt fruit and vegetable set. We have a few wooden ones, but I am hoping to add a collection of knitted and felt food as well.


These are from Big Little Felt Universe by Jeanette Lim (still can't quite work out the book title!) It has some good fruit and veg patterns as well as the most gorgeous felt gingerbread house that I would love to make for Hansel and Gretel as well as for Christmas display. My boys covet the felt campfire.
I did change the leaves on the carrots and added the stitching lines on the body of the carrots.
There were five of these carrots originally but one seems to have mysteriously vanished! I'm sure it will turn up somewhere strange!

And getting prepared for autumn, this is the playsilk I dyed for the autumn nature table. Burnt orange with moss green and brown.


Happy creating!

End of Summer Nature Table

Rocking and rolling the boat on the sea
Rocking and rolling with you and with me
Wind come and blow us so gently along
Mermaids come guide us and sing us a song.


Sail, sail, pretty boat with me
Sail, sail, o'er the shining sea.
Out on the waves that dance and play,
Sail till the close of day.
Rock, rock, little boat with me,
Rock, rock, on the stormy sea.
Out on the waves that toss and foam,
Rock till you bring me home.

(Poems from Spindrift.)


It is nearly the end of summer here, so we are making the most of it with our nature table. Paper boats rocking on the sea (which I had to google how to make, as I couldn't remember!), Father Sun shining in the sky (suspended on a length of fishing line),  a windswept tree (which will have a 'clay' base, when we manage to make some more, rather than being in a glass bottle!) and just a few shells. Whirlwind is definitely not a subscriber to the 'less is more' theory. That is how many shells were in the basket and they were ALL going on the table!


Farewell, summer!

P.S. When I went to link this to The Magic Onions, I found this post on making paper boats that puts our little efforts to shame! What a beautiful boat and I must definitely remember the oil treatment idea.

Wednesday 22 February 2012

Yarn Along

Time for Wednesday Yarn Along at Small Things.


Currently dipping into Vintage Notions by Amy Barickman. I just love anything vintage and this is a gorgeous book. I love the illustrations from the 1920s.


And so many nuggets of wisdom to absorb.


Happiness needs no accessories, for it is in itself omnipotent. It takes hold in the heart, builds its nest, and brings forth its own birds to sing for you.
 Cheerfulness is much more to be desired than riches. Those who possess it have something riches cannot buy - a great possession because it creates goodwill and makes for real happiness.
I must admit to having to strive for cheerfulness sometimes - it is very easy to become frustrated with so much to do and so many in the family to care for. It seems there is always something that needs doing!

My knitting pictured above is called Colours of Joy shawl from the book Knit Prayer Shawls by Leisure Arts. There are a few patterns in here that I would like to make and it is a very affordable little book. Also spiral bound which is really handy! I am using the Jenny Cook alpaca/silk so it is really beautiful to work with.

The Pebble vest from last week is finished (well, except for the buttons!) so Cuddlepie sort of modeled it.


 I am thinking wooden buttons to finish.
And what to do with the leftover green yarn? As part of the Stash Busting Challenge, I could not simply put it back in the cupboard. So it became an I-cord for the play cord basket.

Tuesday 21 February 2012

Shrove Tuesday

Shrove Tuesday today. We made pikelets for morning tea. I don't know if there are pikelets in the US? If not, they are just mini pancakes, so use any pancake batter and just make them smaller.


Whirlwind always likes to eat the crunchy bits that drip into the pan and cook up all crispy and buttery!


We ate them with jam and cream - just because! We can all do with a little whipped cream now and then!


And a new use for baskets. I bought these baskets the other day from the $2 shop, thinking they would be good for sorting. This is what Whirlwind thought they would be good for.


And Legoman thought they looked like snake charmer baskets.

Our Substitute For Air Drying Clay

A while ago, I was given a photocopy of this great 'recipe' for air drying dough. It is easy to make and works out much cheaper than air drying clay (which is hard to get and expensive where we live).

You will need:

Half a cup of cornstarch / cornflour
One cup baking soda
Half a cup of cold water

Put the ingredients in a saucepan and stir over medium heat for a few minutes until the mixture thickens to look like moist mashed potatoes. Then place the mixture on a plate and cover with a damp cloth until cool. Knead it like dough. It is then ready to use.
I have found that it must all be used in one go - it goes hard within a day and is unusable.

The recipe that I was given had an example of using it to make fossils, so that is the first thing we did. We shaped the dough into balls which the boys then flattened out with the palm of their hand. Then they pressed shapes into it - shells, rocks, leaves, a toy lizard. I do not have a photo of these as they were taken out into the sandpit and garden and buried to find later as 'fossils' and who knows where they are now!

But we also used this dough to make these diya lamps.


The boys just made the basic shape, but Miss Butterfly made more elaborate shapes. She had also made a flower shaped one that was beautiful, but she dropped it while painting it.

This is a really versatile recipe and because the clay is white, painting shows up clearly and you don't need tons of paint to make the colour show up.


Crafting On

Time for Tuesday craft over at Frontier Dreams. I have been working on a few bits and pieces; dyeing lots of silk for my new little enterprise and some more yarn.

But I finished this Father Sun yesterday and I really like how he turned out.


I am calling him Father Sun as that is what I set out to make. But he could also be a happy smiling flower - put some brown in the middle and he is a sunflower, give him white petals and he is a daisy.
He is based on a Father Sun puppet by Suzanne Down of Juniper Tree Puppets (Living Crafts magazine Spring 2009 issue). If you haven't already, you should sign up for her free story newsletter. It is such a fantastic resource for stories and puppet ideas. I love it.

I altered it a bit as I wasn't making a puppet, just a sun to display above our nature table.
I am pretty excited that the wool is from our own sheep.


First, just make a needle felted circle, whatever size you like.


Then roll small balls of wool and pull them into roughly triangular shape, however many rays you would like. After finishing him, I realise I used an even number of rays so I wish I had added a seventh to make him a little less symmetrical.


Needle felt the rays. I then wet felted it as the rays didn't seem too strong, but see how he feels.


Once he is dry, take some small amounts of wool and roll a thin sausage for the mouth and some little balls for eyes and cheeks and needle felt them on very loosely.


And there he is! The more I look at him, the more I think he looks like a flower. But the boys think he is a great sun - nothing like the adoration of your children! They are still at the age where they think I can do anything!

On Monday We . . . . .

I love it when days are quiet and lovely and just seem to flow right all day (or most of it anyway!)

Today we:
Raked leaves
Made crowns

A very happy king
And a very serious king!
I dyed a new silk river
And a fun day was had by all!


Sunday 19 February 2012

Rudolf Steiner - A Truly Remarkable Man

Rudolf Steiner truly was a remarkable man. I am reading more of his works and the deeper I sink into the readings, the more I am amazed by him. His insight and the clarity of his thoughts and his bravery in putting them in the public arena when, let's face it, the majority would have thought (and still would!) that he was a bit crazy - Wow! I will be eternally grateful to him.

I am currently reading a little book called The Therapeutic Eye: How Rudolf Steiner Observed Children by Peter Selg. Only 88 pages but packed full. On the very first page this quote from Steiner jumped out at me (the chapter is entitled A Look Deepened By Love).


The first task to be achieved on the basis of anthroposophy in education can therefore be that, to begin with, the aim is to see that the teachers, the educators, are people who perceive the human being in the deepest sense and, having developed this attitude of genuinely observing the human being, approach the child with the love that results from such an attitude.
I cannot imagine that that premise is being taught in mainstream teaching degrees. But just imagine if it was!!

Thank you, Rudolf Steiner!


Saturday 18 February 2012

Like My New Banner?

When I first set up the blog, I liked the banner I had. But today I got to wondering why I didn't have a banner relating, in some way, to toadstools? After a peek around the public domain images, I found this gorgeous painting by Richard Doyle called Fairy Rings and Toadstools (either 1870 or 1875, different sources have different dates).


More appropriate, I think!


Making A Sunflower Gnome


We in the Southern Hemisphere are, of course, still in summer, so I thought I would make a little sunflower gnome to grace the nature table.

Some of the photos are a bit off as it is quite late at night here and the flash makes everything look a bit wrong!

She started out as this little peg body.

I don't have any photos of the next few steps as I had already half made her before I decided to blog about her!

The next steps are like the directions in this tutorial on flower fairies from Wee Folk Art. I changed the shape of her petals to make them longer, more pointed and not quite so 'puffy'.

The hat is made like the gnome hats in the book Feltcraft by Petra Berger.


Her hair is just some brown wool roving, glued in place, then twisted to make the pigtails.


To draw her little face, I just used Legoman's markers and Ferby pencils for the cheeks, using these basic directions.


Don't you love the dinosaur egg he keeps his pencils in? He had one of those build your own dinosaur kits and it came in this egg. Even though it is plastic, it looks kinda natural and he just loves having his pencils in a dinosaur egg. He thought he was very clever to repurpose the egg as he really wanted to keep it.


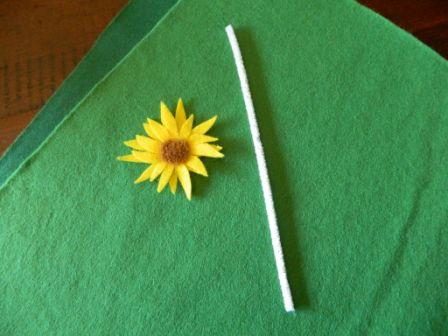
To make her sunflower, I used the directions here. The Living Crafts blog is an absolute treasure trove of gorgeous crafts to make. I subscribe to the magazine and I love it!


The leaves and stem are made in two different shades of green. I used the darker one to cover the stem and for the main leaves. I then cut some smaller 'leaves' to place in the middle of the dark green leaves.


The stem is a pipe cleaner, doubled over to the length I desired. I cut a thin strip of dark green felt, covered one side in PVA craft glue and wrapped it tightly around the pipe cleaner.

The light green leaf was glued onto the larger leaf. Then the leaves and sunflower were just glued onto the stem. I will see if this will hold up or whether it would be best to put a few stitches through the leaves and sunflower into the felt on the stem to keep them in place.


Put the two together and you have a sunflower gnome!


Apologies for the rather bedraggled looking gum blossoms in the background! We went to the park today and there is a huge pink flowering gum (my favourite gum tree) overhanging the playground. My rule at the park is that you may collect anything that has fallen naturally and it was quite windy last night. So we had quite a collection of gum nuts, blossoms and leaves to bring home.


And I just love them as they remind me of my very favourite book growing up, Snugglepot and Cuddlepie. One of the characters was called Little Ragged Blossom and she wore a gum blossom skirt.


Isn't she too cute? And I even found a pattern for knitted gumnut baby finger puppets.


Thursday 16 February 2012

When You Are Dyeing Playsilks . . . . . .

When you are dyeing playsilks and you are wondering where the undyed ones have disappeared to, take a look in your hallway and you will probably find that they have been stolen in order to make the South Pole.


 (We will not worry about the fact that polar bears and Arctic foxes are not to be found at the South Pole - Whirlwind is only three after all!)

And then you will find Cuddlepie in his favourite spot.


Not quite sure of the attraction of being squashed in the corner in between a wall, a box of books and a drawer unit, but he heads for that spot all the time.
Please do excuse the carpet - we will eventually remove it and sand the floorboards. The hallway and childrens' bedrooms have been done already, but it is a matter of deciding that we can live and renovate at the same time!